Saturday 23 March 2019

Popcorn Flower Pincushion - Free Crochet Pattern

This super cute popcorn flower pincushion would make a lovely gift for someone crafty.  Next week is Mother's Day here in the UK and if you are looking for a last minute gift for your mum why not try this simple pincushion pattern.  I used Drops Lima DK for mine but you could use any DK yarn.  It's great for using up your stash and can be made in just an hour or two...


Free Crochet Pattern


Popcorn Flower Pincushion


Materials

DK yarn in two colours (small amounts approx 10g for flower and 15g for main colour)
A pretty button
Toy stuffing
Darning needle
Pins

Hook

4mm (G) hook

Abbreviations / Terms

US terms used throughout / (UK terms)
sc - single crochet (double crochet)
dc- double crochet (treble crochet)
sc2tog - single crochet 2 together (double crochet 2 together)
sl st - slip stitch
ch - chain
pc - popcorn
bpc - beginning popcorn
sp - space
st - stitch

Special Stitches:  Watch this Popcorn Stitch video if you are new to this stitch...


Beginning popcorn ch 3, 4dc in same sp, remove hook from stitch and insert in top of ch 3 from front to back, insert into last stitch loop from back to front and pull through.

Popcorn 5dc in same st, remove hook from stitch and insert in top of first dc from front to back, insert into last dc and pull loop through.


Other notes: I like to use a chainless dc at the start of rows and rounds instead of the traditional ch3.  If you would like to learn how to do this you can watch this video.


Popcorn Flower Make 1

Round 1 With contrast colour ch 4 and join with sl st to form ring.  Ch1, 8sc into ring, join with sl st to starting sc.  (8sc)


Round 2 Bpc in 1st sc, ch2, [pc in next st, ch 2] in each sc around and join with a sl st to top of first pc. (8 popcorns)


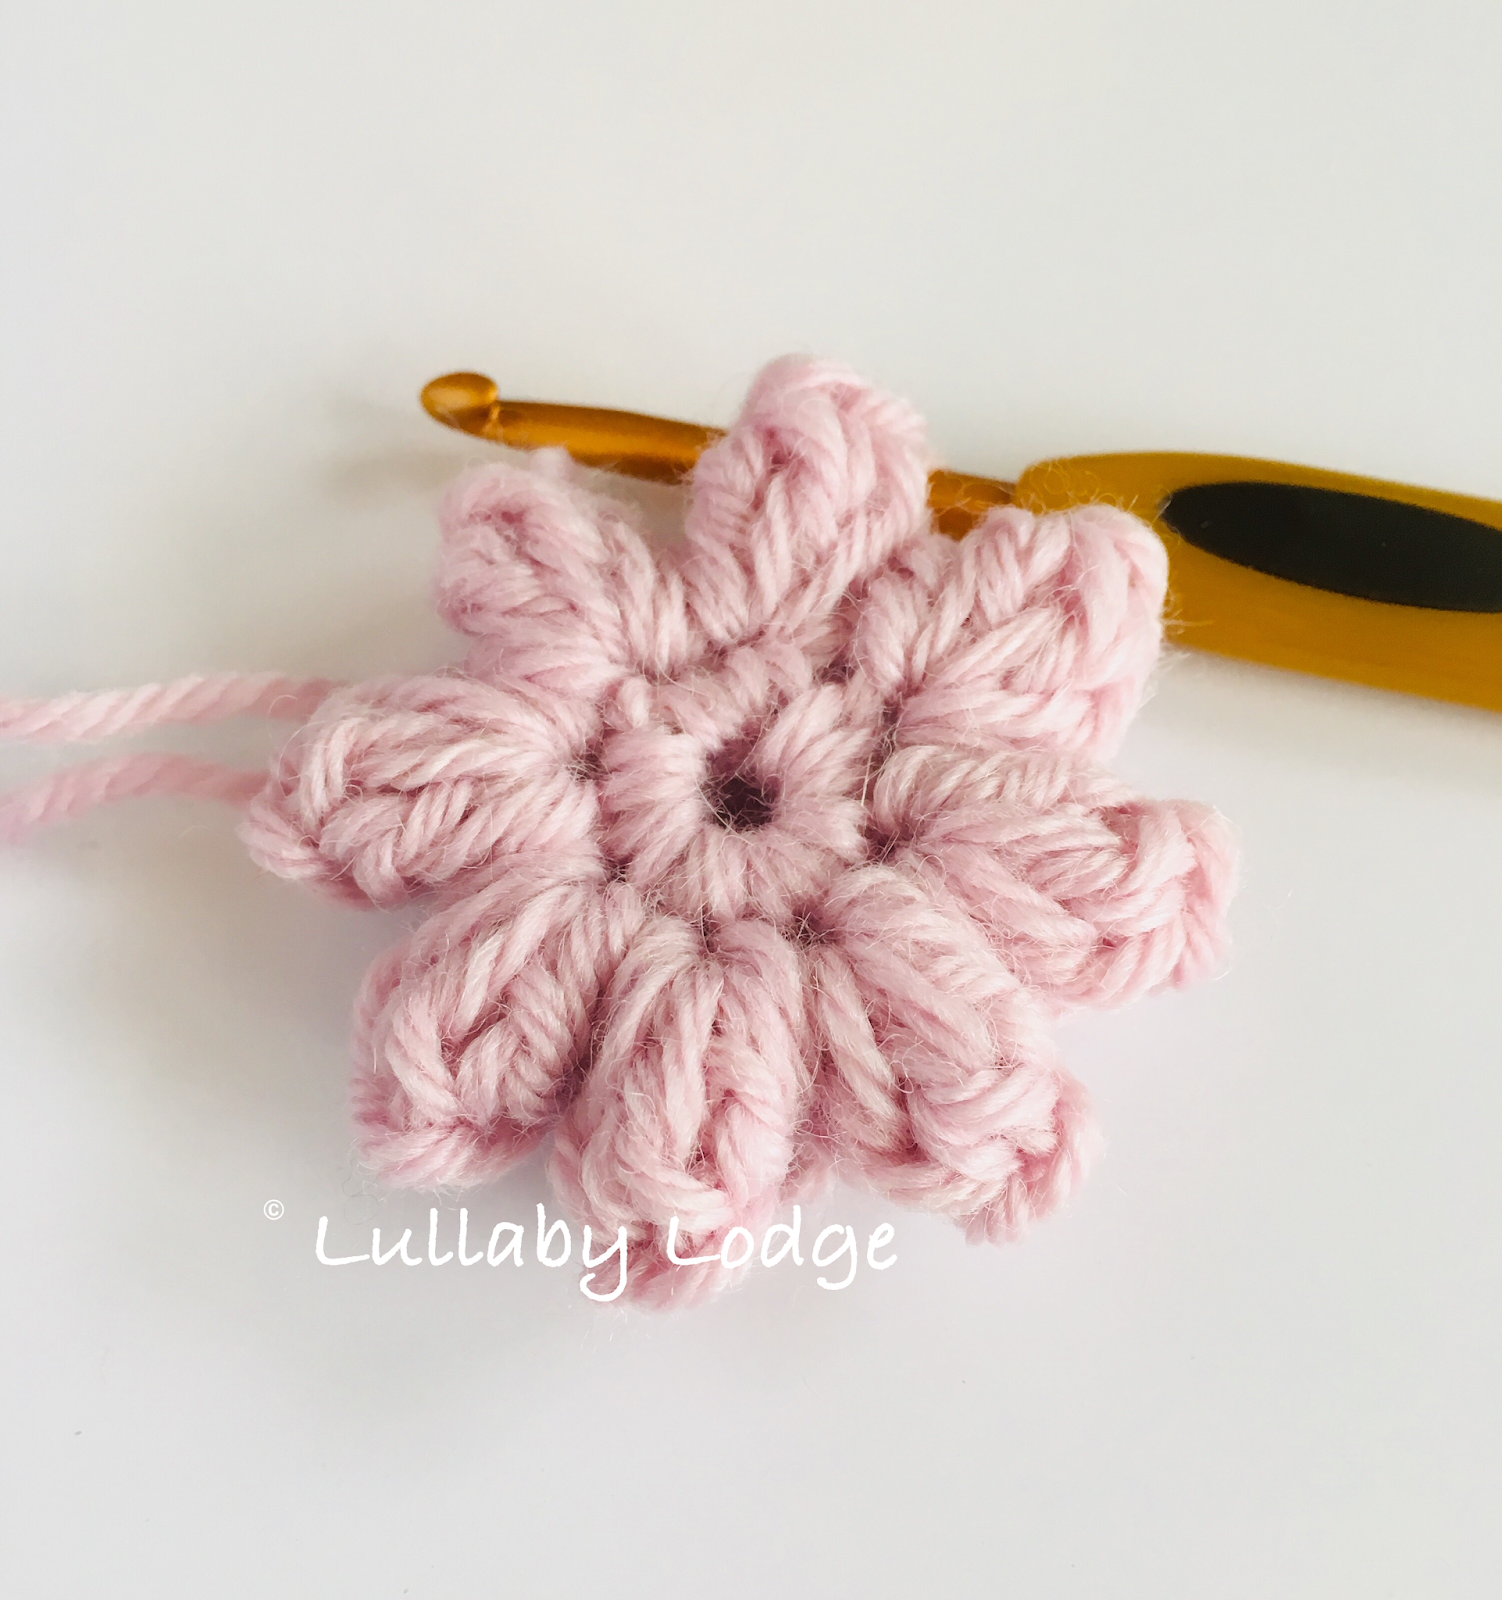
Round 3 Sl st into next ch sp, bpc in same sp, ch2, pc in same sp, ch2 [pc in next sp, ch2, pc in same sp, ch2] in each sp around.  Join with sl st to starting pc.  Fasten off.  (16 popcorns)


Body of Pincushion.

Round 1 With main colour join yarn with a sl st to any sp.  Ch1, 2sc in same sp, sc in top of pc.  [2sc in next sp, sc in top of pc] repeat around and join with sl st to starting sc.  (48 sc).


Round 2 Working in back loops only, ch1(does not count as a st), sc in each st around, join with sl st to starting sc.


Round 3 Ch1, sc in each st around, join with sl st to starting sc.

Rounds 4-6 Repeat round 3


Round 7 Repeat round 2


Decreases

Round 1 [sc2tog, 4sc] repeat around, join with sl st to starting sc.

Round 2 [sc2tog, 3sc] repeat around, join with sl st.

Round 3 [sc2tog, 2 sc] repeat around, join with sl st.


Using toy stuffing, stuff firmly.


Round 4 [sc2tog, sc] repeat around, join with sl st.

Round 5 Sc2tog around, join with sl st.  Fasten off leaving long tail.  Thread yarn onto darning needle and weave in and out of remaining stitches and pull tight.  Secure and weave in ends.


Sew a pretty button in the centre of the flower and add pins.


A printable PDF version of this pattern is available in my Etsy store...
Enjoy!

Catherine
x

You might like...


This post contains affiliate links...


Sunday 17 March 2019

Easter Crochet - 6 Fantastic Free Patterns to Make This Easter

Hello everyone!  As Easter is rapidly approaching, I thought I would share with you some of my favourite patterns.  I have selected six of the cutest, colourful projects I could find.  They are really quick and easy to make perfect for a last minute Easter gift...


Six Fantastic Free Patterns to Make This Easter


How cute is this bunny rag doll by Spin a Yarn Crochet, hooked in pretty pastels.  Any girl would love to receive this for Easter.

Ragdoll Spring Bunny


No Easter is complete without some eggs...  and these spiral crochet ones look good enough to eat.  Designed by Krazy Kabbage.

Spiral Easter Eggs


Your little ones will love snuggling up to the little lamb lovey.  Pattern by SWE Craft Corner

Little Lamb Lovey


Make these super cute little baskets and fill with mini eggs.  Pattern by Skip to My Lou.

Cutest Mini Crochet Basket


How adorable is this bunny garland, just look at their cute fluffy tails.  Pattern by Sew Historically.

Crochet Bunny Garland


My last selection is this pretty Easter headband, pattern by Grace & Yarn.

Crochet Bunny Headband


I hope you enjoyed this round-up of free patterns, I will be back soon with more crochet and crafts.

Take care
Catherine
x

Contains Amazon affiliate links...


How to make Paper Flower Embellishments with Punches

This post contains Amazon affiliate links...

Hello everyone.  This weekend I have been enjoying playing with my new toys.  I just bought myself a set of daisy flower punches and they are so much fun to use.  I bought the Vaessen Creative Flower Set from Amazon but there are many other flower punches out there.  The set comprises of 3 different size daisy style punches which can be layered with all different colours and patterns of paper to make beautiful unique paper flowers.

Paper Flowers


Materials

Flower punches in different sizes
Glue
Designer, coloured paper or light cardstock
Mini gems, puffy paint, (you could also use tiny punched circles for the centres).


To use them you simply choose the paper you would like to use and punch out lots of flowers in the different sizes.  You can then layer them if you wish, sticking them together with a little glue.  I added sticky gems or 3D Pearl Paint to make the centres of the flowers.  For a more 3D effect you can curl up the petals with the edge of some scissors or use dimensional foam stickers to attach them to your projects.


If you have children they will love making these (they may need a little help with the punching...)


This is such a great way to use up your paper scraps.


The flowers can be used to embellish many things. Use them for cards, gift wrapping, decorating notebooks the possibilities are endless...


If you would like to have a go at making these I will leave some links at the end for the materials you will need.  I will also link some Youtube videos for more paper flower ideas...

Have a great day!

Catherine
x

Mini Paper Flowers - Alphe Crafts

How to make a daisy flower - ABC TV


Sunday 10 March 2019

Craft Fair Idea #3 Matchbook Notebooks - 2019 Craft Fair Season

Hello friends and welcome back to another instalment of my Craft Fair Series.  This week Little T and I have been making these super cute matchbook notebooks.  They are so much fun to make and feature a really simple design, a great project for getting the kids involved.  I got this idea from Crafty Crafts by Deanna over on Youtube and I will link her video at the end.


Craft Fair Idea #3 Matchbook Notebooks

Materials

Mini notebooks (I got mine from Ebay, they were 8 books in a pack for around £2)
Double sided tape
Designer paper 
Embellishments
Staples
Clearbags (optional)
Bone folder
Paper trimmer or scissors


First you will need to measure your notebooks to work out what size you need to cut your designer paper to.  I used a paper trimmer to cut the paper to size but you could use scissors.  We got our paper pad from The Works, they have a great selection of crafting materials at really great prices.  We used their Ombre designer pad for this project.


You then need to cover your notebooks with the designer paper using double sided tape (I used a tape runner for this).  Our notebooks were not matchbook style so I removed the front cover leaving just the notepad and card backing.


You need to kind of bend your paper around the notebook starting at the area where the papers are glued together.  Use your bone folder to burnish the edges and make nice neat folds.


Once the paper was securely glued on, I added a staple at the bottom in the centre for extra security.  Now you are ready for the fun part, the decoration.  You can embellish these any way you like.  We used some dimensional stickers we got in Poundland and some washi tape.


Little T really enjoyed decorating these, don't they look cute?


To finish them off and for a more professional look we put each notebook in individual clear bags.  You can buy these from many places, I have bought them from Ebay and The Works in the past.

I hope the children will love these at the craft fair and I will be back next week with more craft fair ideas.

Enjoy!
Catherine
x

Crafty Crafts by Deanna - Matchbook Notebooks

This post contains affiliate links...


You might like...


Listen to your favourite books while crafting with an Audible subscription...


You might enjoy...


Saturday 9 March 2019

Knitted Washcloths, Facecloths, Spa Cloths, Dishcloths - Free Pattern

This pattern was recently featured in an article in Let's Knit magazine.  You can read all about it here...


For those of you that have been waiting for this pattern (I had a number of requests for a knitted version of my Splashtime Washcloths) here it is.  This pattern is aimed at beginner knitters and would make a great first project.  If you need to learn the basic knit stitch I recommend watching some videos on Youtube, there are many to choose from.


Splashtime Knitted Washcloths

Materials

2 50g balls Drops Safran or any other cotton 4ply (makes 2 washcloths)
Darning needle

Needles

5mm (8) needles

Size

20 x 20 cm (8 x 8 inches)

Abbreviations / Terms

k - knit
st(s) - stitch(s)

Notes: Yarn is held double throughout to create the two-tone marbled effect.  If you would like a single colour you may use 1 strand of Aran (worsted) yarn instead.  Knitted in Garter stitch throughout (knit every row).

With 2 strands and 5mm (8) needles cast on 37 st's.

Row 1 k

Repeat row 1 until piece measures approx. 20 cm (8 inches) long.  Length should measure the same as width, if your tension is slightly different to mine you can just keep knitting until your piece measures the same as your width.

Cast off loosely and weave in ends.


These washcloths make great gifts or a great craft fair item.  You can read about my Craft Fair Idea #1 here...


If you are looking for a crochet version you can find that here...


If you would prefer a PDF printable copy of this pattern, this can be found in my Etsy and Ravelry stores...  The pattern includes a free copy of the belly band labels or these may be purchased separately.

Enjoy!

Catherine
x

Helpful Links

This post contains Amazon affiliate links...

You might like...


Saturday 2 March 2019

Craft Fair Idea #2 Pocket Tissues - 2019 Craft Fair Season


Craft Fair Idea #2 Pocket Tissues


So here we are with my second instalment of my craft fair ideas.  These pocket tissue cosy's are super cute and so easy to make.  The pattern for these cosy's is one of the first patterns I ever wrote on my blog and you can find it here...

Pocket Tissue Cosy


For these cosy's I used Drops Paris with a 5mm (H) hook, which is an aran weight yarn and comes in lots of lovely bright colours.  I followed the pattern but left out the edging and button loops.  


I finished them off by adding cute buttons and some labels.  I made the labels in Canva which is a free design software but you can do something similar in Word.  I cut them out and glued them onto  designer paper to make the belly bands.


Hopefully these will be a popular item.  Everyone needs tissues right? and the buttons make them just too cute...

I hope you enjoyed this pattern, please be sure to let me know if you try these.

See you again soon
Catherine
x

I now have some printable gift labels that can be used for small crochet project such as these pocket tissues or dishcloths.  You can find these in my Etsy Store...


The labels come with a free PDF copy of the Pocket Tissue Pattern.


Ravelry Pattern Page

A printable version is also available in my Etsy Store...


This post contains affiliate links...


2019 Temperature Blanket Free Pattern & Crochet Along - Winter Update


Hello everyone.  How are you all getting on with your temperature blankets?  Mine is coming along nicely and as Winter is now over (hopefully) I thought I would post an update and a few pictures.  If this is your first time to my blog you can find the free pattern linked below and don't think it's too late to join in, you can start a temperature blanket at any time if year.

2019 Temperature Blanket Free Pattern


My temperature blanket started off as just a concept and some yarn pegs to help me choose my pallet...


The beginning of the year was cold but never reached the kind of temperatures we had last year so some of my colours have not been used.


There is nothing better thank a cup of tea and a little crochet in the mornings, I try to do my row each morning when I wake up.


Spring seems to have come early this year as temperatures have been unusually high.  Who would've thought we could have t-shirt weather in February.


Looking forward to seeing what the rest of the year will bring...


Don't forget to post your photos on the Facebook Group page or on Instagram using #lullabylodge.

I will post another update at the end of spring...

Ta ta for now
Catheirne
x

This post contains affiliate links...